Here at DataCraft we have recently needed to look at finding new office space. There is a reasonable amount of space that we can look at around the city here in Wellington, New Zealand; so the question becomes how we narrow the search to make the exercise a bit more manageable. Why not let the data guide us?
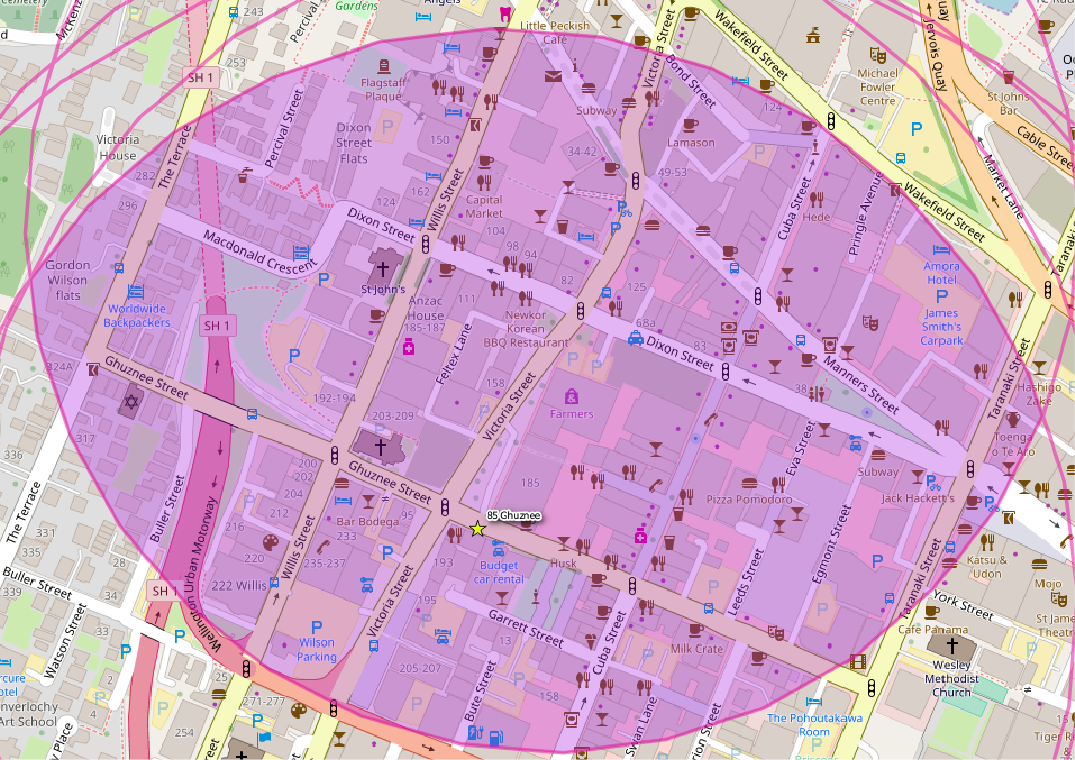
Our goal was to specify an area in the city that was optimally placed for some of our favourite spots around town. This seems like a problem a bit of geospatial analysis would help out with. We came up with the below map which plots out our points of interest, generates a catchment around each point using a weighting for how important that location is to us and then an area generated by the intersection of those catchments. This defines our office search location.
New Office Search Location
I’ll walk through how we created this map below.
Step One : Define our Locations of Interest
I like doing spatial work in PostGIS, and being a database guy it seems like a natural way to store and manage data for me too. I already have a spatially enabled database on my local PostgreSQL that I’ll use.
My first task is to create a table that is going to hold the point data that will represent my locations of interest.
create table public.interest_locations
(
  id int primary key,
  name varchar(100),
  geom geometry(Point,2193),
  weight double precision
);
We then insert data into the table to represent our locations of interest.
insert into public.interest_locations ( id, name, geom, weight )
values ( 1,'LBQ', public.st_transform(st_setsrid(st_makepoint(174.774956,-41.290696),4326),2193), 1.2 );

insert into public.interest_locations ( id, name, geom, weight )
values ( 2,'Rouge & Vagabond', public.st_transform(st_setsrid(st_makepoint(174.774488,-41.293407),4326),2193), 1.1 );

insert into public.interest_locations ( id, name, geom, weight )
values ( 3,'Satay Village', public.st_transform(st_setsrid(st_makepoint(174.775364, -41.293066),4326),2193), 1.0 );

insert into public.interest_locations ( id, name, geom, weight )
values ( 4,'Fortune Favours', public.st_transform(st_setsrid(st_makepoint(174.776758, -41.293056),4326),2193), 0.9 );

insert into public.interest_locations ( id, name, geom, weight )
values ( 5,'Warehouse Stationary', public.st_transform(st_setsrid(st_makepoint(174.774029,-41.291992),4326),2193), 0.75);

insert into public.interest_locations ( id, name, geom, weight )
values ( 6,'Parking', public.st_transform(st_setsrid(st_makepoint(174.774587,-41.292028),4326),2193), 0.75);

insert into public.interest_locations ( id, name, geom, weight )
values ( 7,'Midnight Espresso', public.st_transform(st_setsrid(st_makepoint(174.774864,-41.294616),4326),2193), 0.75);
We generate the geometry data using lattitude and longitude data obtained from Google Maps. We use three functions to achieve this:
- st_makepoint : takes the x and y coordinates to generate the point
- st_setsrid : sets the coordinate system we are using, in this case WGS84 which has an SRID of 2193
- st_transform : changes the coordinates system from WGS84 to NZGD2000; because we want to work in units of metres which NZGD2000 uses, while WGS84 uses longitude and latitude as units.
Of course, NZGD2000 is a New Zealand specific coordinate system; so you’ll want to substitute this for an appropriate local coordinate system for your geography.
Step Two : Plot the locations in QGIS
We use QGIS for spatial visualisations in conjunction with PostGIS. Create a new project and add a new PostGIS database layer. We simply query the table, including the id, name and geom fields.
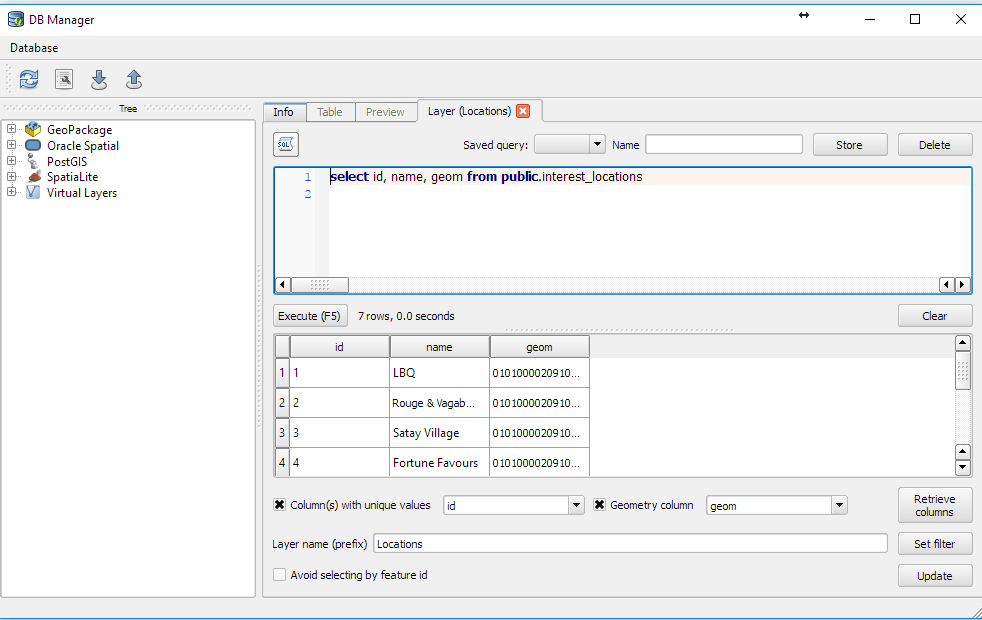
Adding a PostGIS layer for Interest Locations
We name the layer Locations.
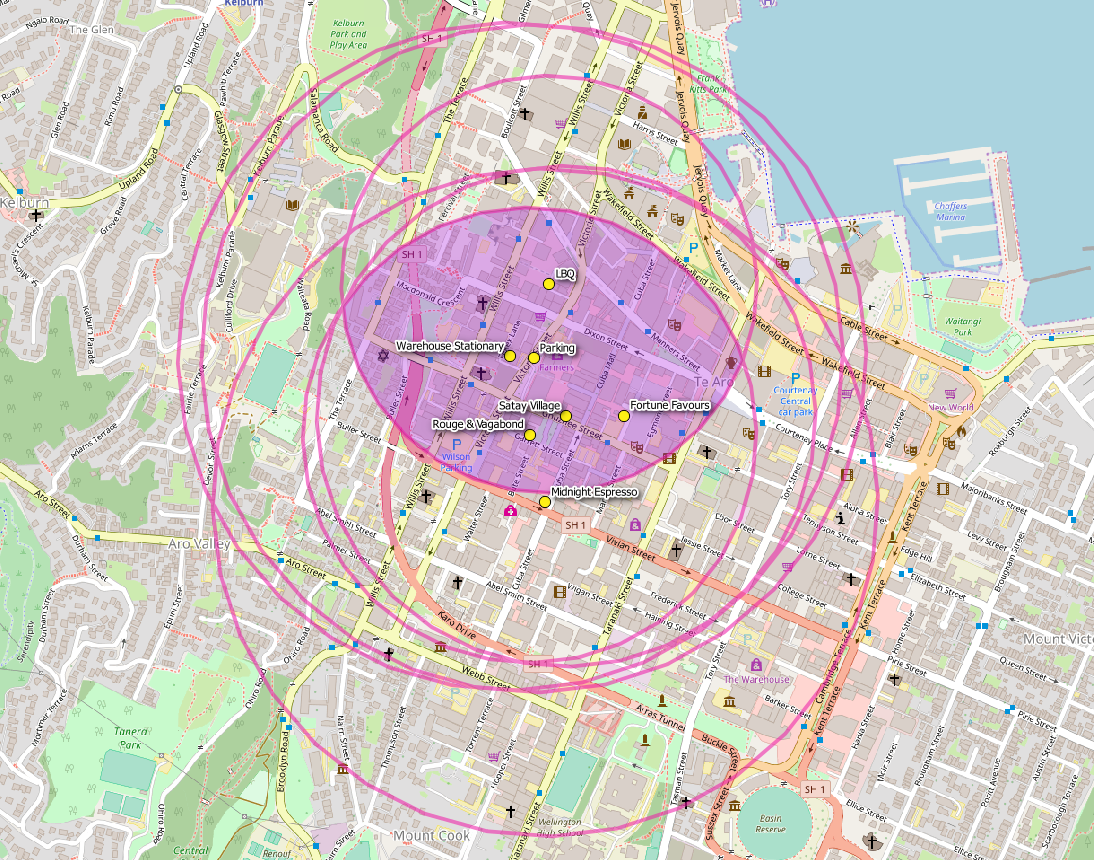
Step Three : Generate Catchments
Next, we want to generate perimeters for each location of interest, based on a standard size but then weighted for each location’s importance. This is easy to do in PostGIS using the st_buffer function. To visualise how the st_buffer function works, have a look at the Boundless website that has some good illustrations (unfortunately it looks like this resource is no longer available, Boundless was purchased by Planet in 2018 and I can no longer find this).
In QGIS we simply create a new PostGIS layer called Weighted Perimeter and define it using the following SQL:
select
  id,
  st_buffer(geom, 500 / weight) as geom
from
  public.interest_locations
In this case, we use st_buffer to generate an area around a point equal to the size passed to it, in this case 500m. The value is in the units of your coordinate reference system, so if your system uses feet, this integer will represent feet. We divide by the weight field to change the size of the perimeter based on the location’s importance. The reason we divide rather than multiply is that we want to be closer to locations of more importance, so by dividing we make the perimeter smaller for more important locations.
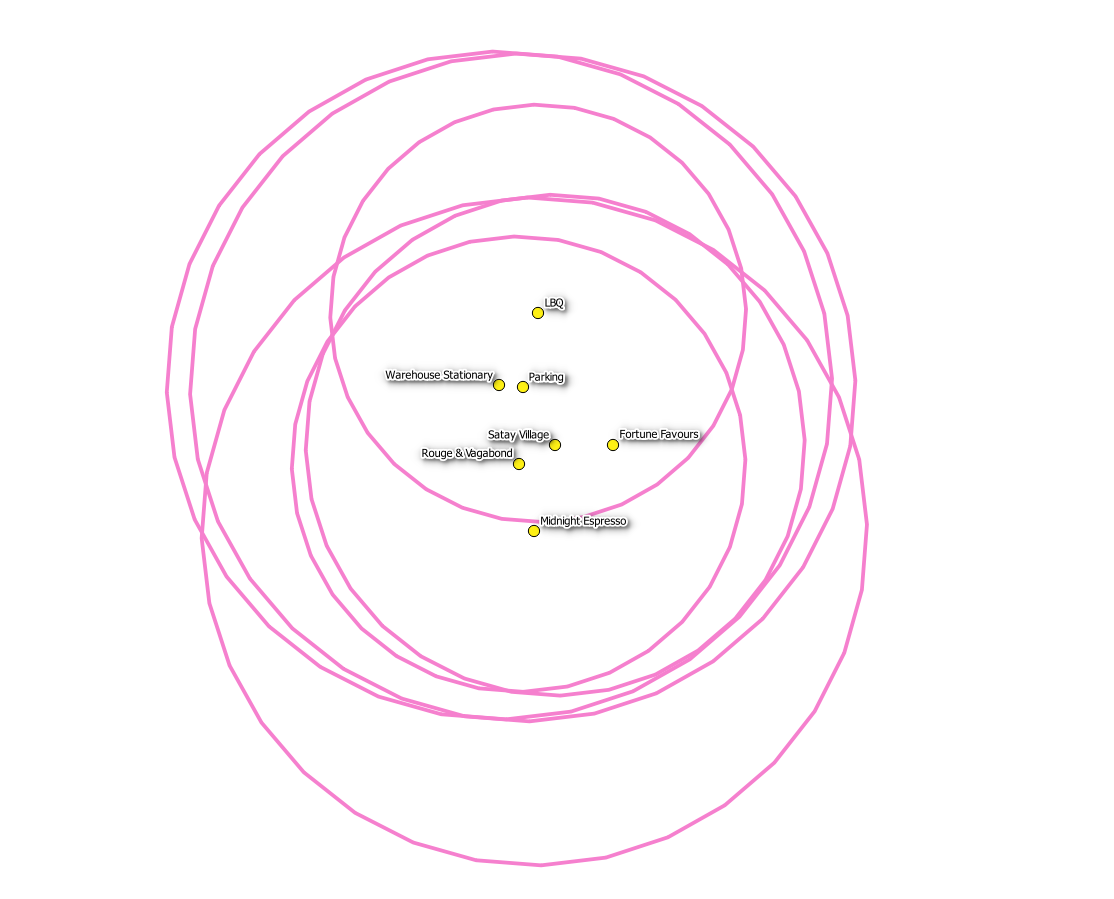
Weighted Location Perimeters
We add some styling to remove the fill and colour the outline and give it some transparency. We now have our locations plotted, each with perimeters which define a weighted 500m distance from each location of interest. Notice how all the circles above are not the same size, this is because of the weighting we applied. The smaller circles are perimeters around locations of more interest.
Step Four : Creating an Intersecting Geometry
Although PostGIS comes with a built in st_intersection function, that produces an area formed by the intersection of two other shapes, it’s limitation is that it takes only two shapes at a time. As you can see above, we have six shapes we want to consider and find the common intersecting area for.
There is no built-in function (yet) in PostGIS that will accomplish this. Luckily, it is relatively trivial for us to construct our own function to take multiple geometries and compute a common intersection. I’ve used the code supplied by Laposhasú Acsa from the StackOverflow question to accomplish this (why re-invent the wheel?).
/* from https://gis.stackexchange.com/questions/60281/query-to-find-the-intersection-coordinates-of-multiple-polyon */
create or replace function ST_IntersectionArray(geoms geometry[]) returns geometry as $
declare
  i integer;
  tmpGeom geometry;
begin
  tmpGeom := geoms[1];
  FOR i IN 1..array_length(geoms,1) LOOP
    tmpGeom:= ST_Intersection(tmpGeom,geoms[i]);
  END LOOP;
  return tmpGeom;
end;
$
LANGUAGE plpgsql;
This function takes an array of geometries, iterates through them all and finds the common intersecting area by applying st_intersection itervatively to the result of the prior intersection. You may need to be careful with this function on a large number of geometries!
We call the function in the following way:
select
  1 as id,
  st_intersectionarray
  (
     array
     (
       select
         st_buffer( geom, 500 / weight) as circ
       from
         public.interest_locations
     )
  )
Lets break this down:
select st_buffer(geom,500/weight) as circ from public.interest_locations
This is the base query that returns the perimeters that we want to intersect, we explained this in Step Three.
array()
This collects the returned records and packages them into an array structure, ready to pass to the function we created.
st_intersectionarray()
This is the custom function we just created, and it takes as an argument an array of geometries to intersect.
We do a 1 as id, simply to give the layer an id value to use, as QGIS likes this.
If we use this SQL statement in a new PostGIS layer on QGIS, we will then get a single area geometry that represents the intersection of all the areas contained by the interest location perimeters. We want to style the area so it has some transparency and a colour that makes it stand out.
Step Five : Context
The last step is to add some context to the plot. We do this by adding an Open Street map layer, which will show us the actual map with streets that the area covers.
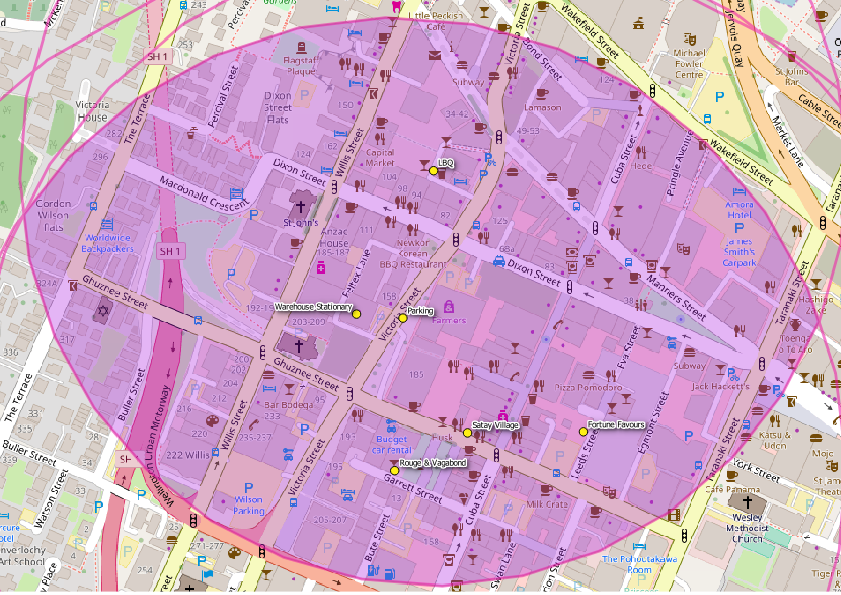
Optimised Office Search Area
We now have an area sorted in which we can begin the search for a new office ….
Incidentally this is where we ended up: